
<- Go Back
Image SEO
Image SEO Explorer and Filters
The Explorer is the left panel inside Image SEO. It gives you a tree-based view of every image on your Framer site, organized by source, so you can quickly scope the image grid to exactly what you need to audit or fix.
Last Updated on
Read Time
5 min read
Section overview
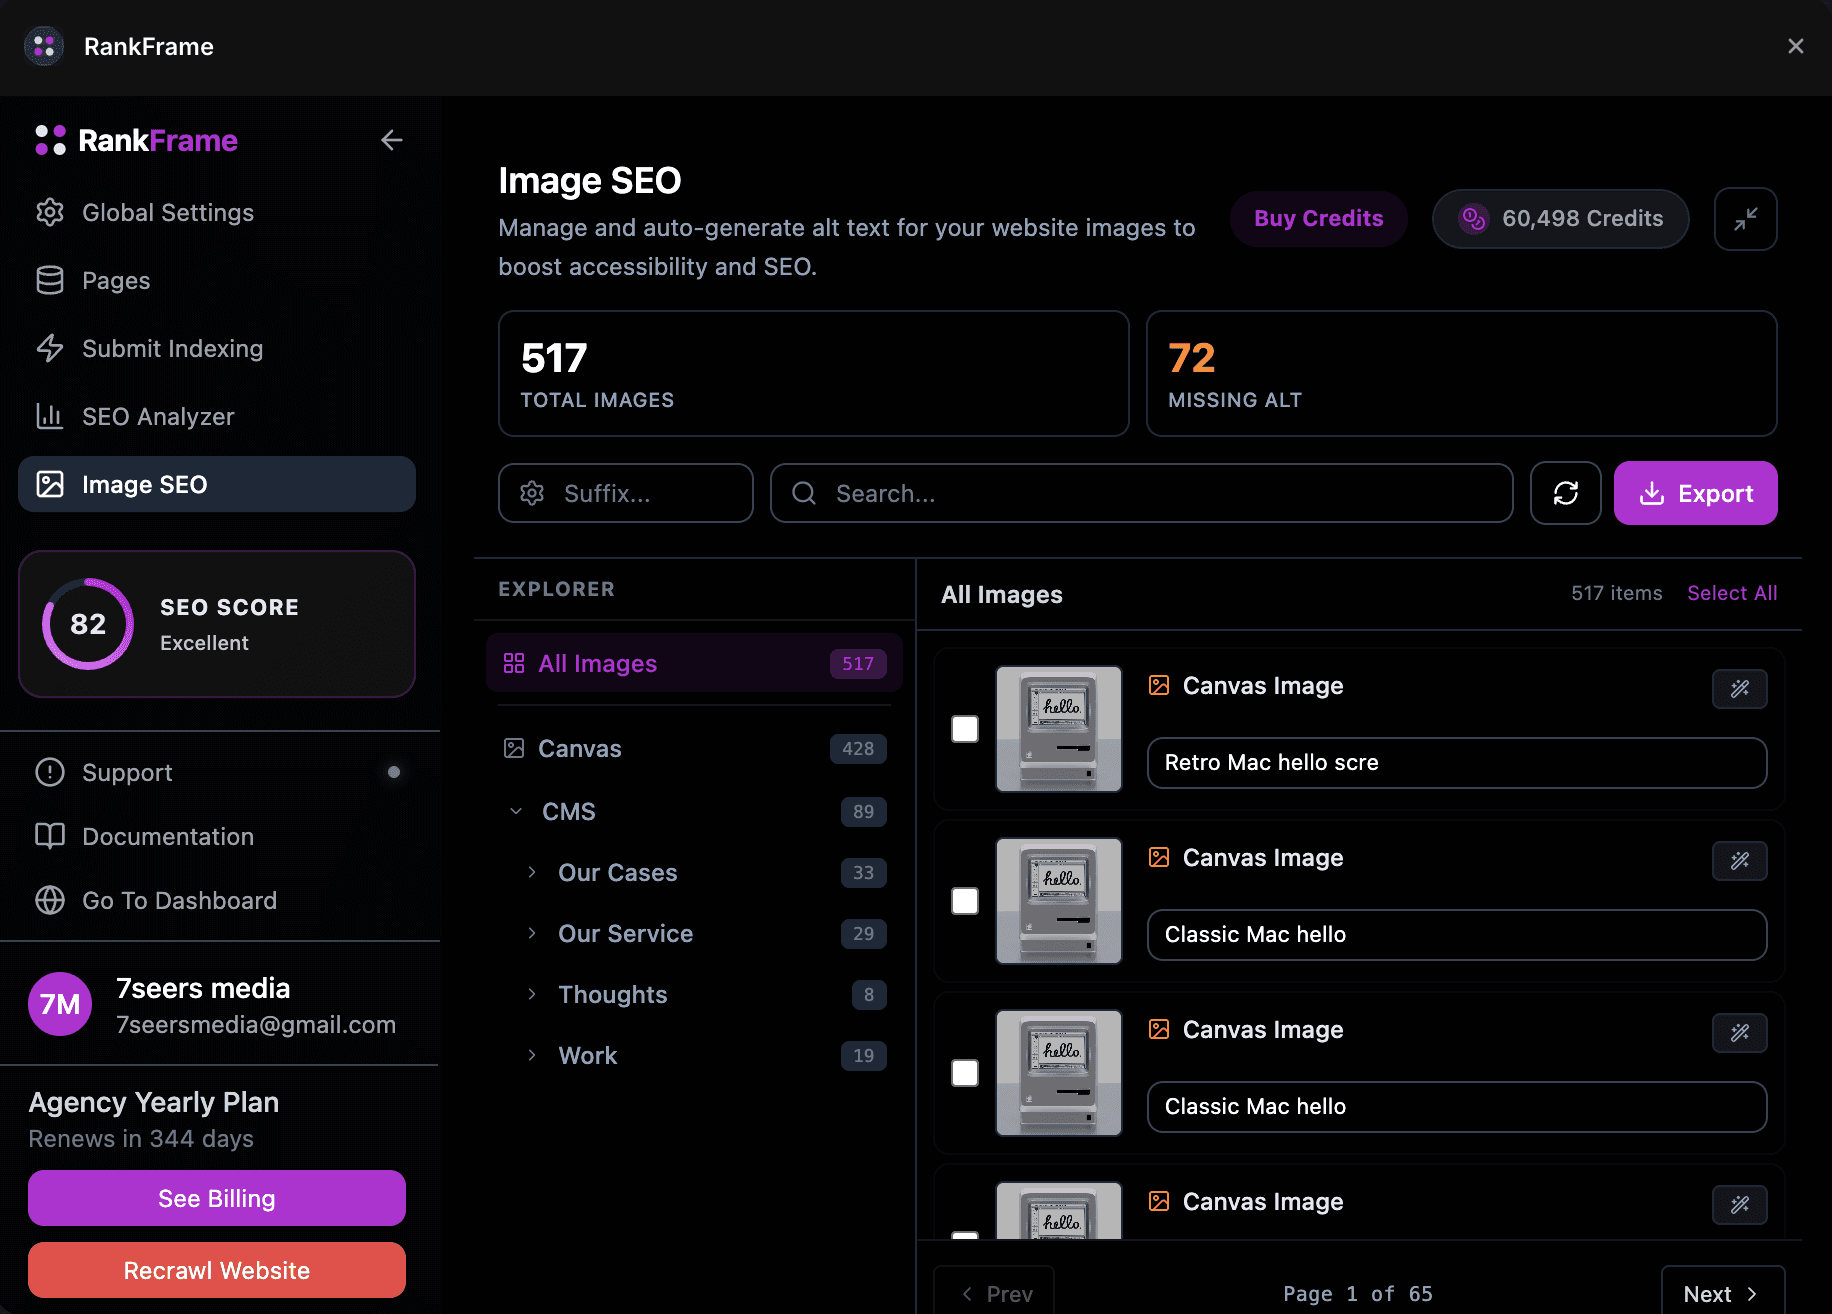
When you open Image SEO in RankFrame, the screen splits into two panels. The left panel is the Explorer. The right panel is the image grid. Above both panels sits a controls row with the site selector, search field, refresh button, and export button.
The Explorer organizes your images into a two-level tree:
All Images: the root node showing the total count across your entire site
Canvas: static images placed directly on Framer canvas pages
CMS: images sourced from CMS collections, expandable to reveal one sub-folder per collection
CMS sub-folders carry the collection name and count. For example: Our Cases (33), Our Service (29), Thoughts (8), Work (19). Clicking any node instantly filters the image grid on the right.
Start at All Images to get a site-wide picture of how many images are missing alt text, then drill into individual collections to prioritize the highest-traffic pages first.
1. Explorer tree
The tree renders three levels: the root All Images node, the Canvas branch, and the CMS branch. Clicking CMS expands it to reveal one sub-folder per collection. Each node shows a count badge.
Selecting a node scopes the image grid. Only one node can be active at a time. To return to the full site view, click All Images again.
Clicking All Images shows every image on the site.
Clicking Canvas shows only static canvas images.
Clicking CMS shows all CMS images combined.
Clicking a CMS sub-folder (for example, Our Cases) shows only that collection's images.
The counts shown in the Explorer reflect the last time data was fetched. If you have published new images recently, click Refresh to update the counts.
2. Site selector
The site selector appears at the left of the controls row as a fully rounded pill. It displays a gear icon followed by the active site name (for example, 7 Seers). Click the pill to open a dropdown and switch to a different site connected to your RankFrame account.
All Explorer counts, the image grid, and search results update immediately to reflect the newly selected site.
3. Search field
The search field sits in the controls row between the site selector and the refresh button. It carries a magnifier icon and a Search... placeholder. Type any characters to filter the image grid in real time.
Search matches against two attributes of each image:
Filename: the file name of the image asset as stored in Framer.
Alt text: any alt text already saved for that image.
The Explorer node you have selected continues to act as a scope. For example, if you have Our Cases selected and then type in the search field, results are filtered to that collection only.
Search for a specific filename to find and update a single image without scrolling through the full grid.
4. Refresh button
The refresh button (circular arrows icon) re-fetches image data from your Framer site. Click it any time you have published changes and want the Explorer and image grid to reflect the latest content.
You have added new images to canvas pages or CMS collections and published the site.
You have deleted images and want the counts to update.
Counts in the Explorer do not match what you see live on your Framer site.
The refresh re-fetches image metadata only. Alt text you have already saved through RankFrame is not affected or overwritten.
5. Export button (CSV)
The export button is styled in purple with a download icon and sits at the right end of the controls row. Clicking it downloads a CSV file containing data for all images currently in scope, including filename, source path, and saved alt text.
The export reflects the current Explorer selection. Select All Images before exporting to get a full site-wide report.
Use the CSV to share an image audit with clients or team members.
Import into a spreadsheet to track alt text completion over time.
Use it as a backup of all saved alt text before making bulk changes.
Export before and after a bulk AI generation session so you have a record of what changed.
Typical workflow
Here is a recommended sequence for auditing image alt text on a new site:
Select your site: Use the site selector pill to confirm you are on the correct Framer project.
Refresh to get the latest data: Click the circular arrows icon to ensure the Explorer counts and image grid are current.
Click All Images and export a baseline CSV: Download a CSV of the full site before you add any alt text.
Drill into Canvas or a CMS collection: Click the Explorer node for the section you want to work on.
Search to find images missing alt text: Use the search field to locate specific images by name.
Add or generate alt text, then export again: After completing a section, export another CSV to track progress.
Frequently asked questions
What is the Image SEO Explorer in RankFrame?
The Explorer is the left panel inside the Image SEO section of RankFrame. It displays a two-level tree of all images on your site, organized into Canvas images and CMS collection sub-folders. Clicking any node filters the image grid on the right to show only images from that location.